


How to Build a Shipping Container House (Step-by-Step Guide for Beginners)
Quick Answer
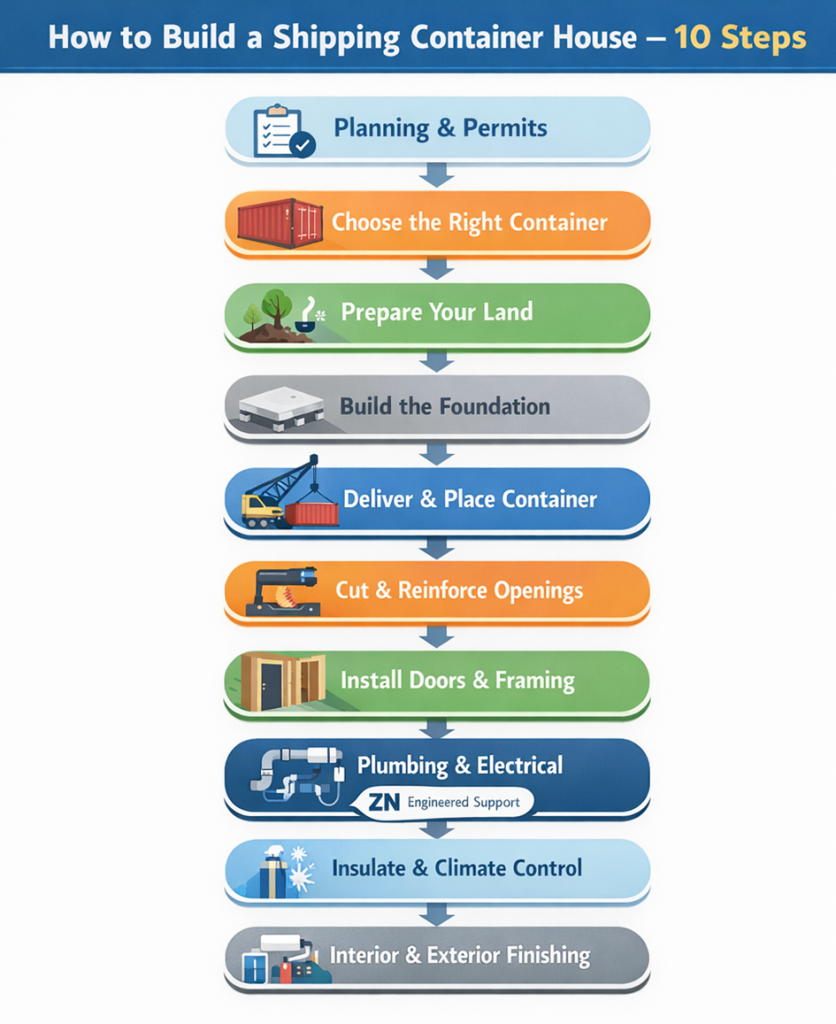
Constructing a home from shipping containers requires executing 10 major steps: planning and obtaining permits, drawing up architectural designs, buying the containers, preparing the site, making a foundation, modifying the structure, installing utilities, insulating, finishing interiors and exteriors. If well planned and with an appropriate provider like ZN House, building a state-of-the-art, sturdy container house is way faster and offers you more architectural flexibility compared to brick-and-mortar type housing.
What Is a Shipping Container House?
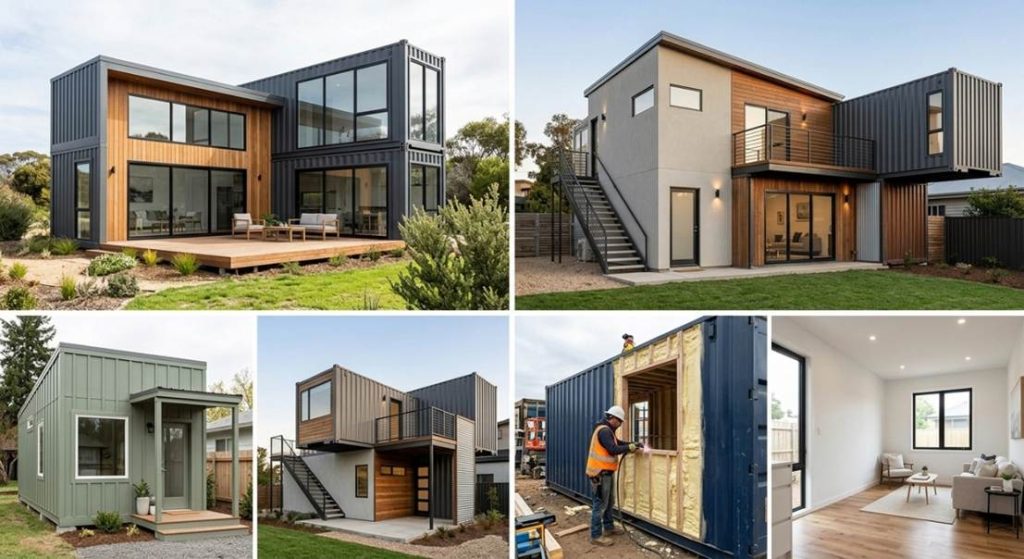
A shipping container house is a home that uses one or more steel containers for the main structural framework. Usually, these houses incorporate standard-sized containers, like 20-ft and 40-ft high-cube, the latter giving extra interior height and more comfort. A shipping container house might be just a small single-container studio or a large multi-container, multi-story house with all the necessary rooms, such as kitchens, bathrooms, and living spaces. Major benefits of this type of construction are the modularity of the container itself and the easy expansion possibilities. Besides, you can combine, stack, and cut containers to come up with flexible layouts as your requirements increase.
Why Build a Shipping Container Home?
Faster Construction: Once design and permits are finalized, the majority of container homes can be built within 13 months, especially if prefabricated or modular components are used.
Greater Flexibility: The ability of containers to be merged, stacked, and moved is a major advantage when it comes to increasing the size or changing the layout of your living space to meet your family’s or business’s growth.
More Eco-Friendly: Besides manufacturing and transportation consuming less steel, reusing steel containers as shells will eliminate many waste metals and support recycling. If you also outfit your container home with efficient insulation and heating/cooling systems, you will be reducing energy use in the long term.
Relatively Controllable Costs: Since the structural shell is standard, it is feasible to scope, price, and phase a project more easily than many fully custom conventional builds.
Step‑by‑Step: How to Build a Shipping Container House
Step 1: Planning & Permits
Clarifying your aim is the very first thing you should do. Do you want a permanent residence, a second home, an office, or a rental property? After that, you should learn about local zoning laws, building codes, and any specific rules that can affect how to build a shipping container house in your city or county. While some communities treat container homes as modular or prefabs, others impose residential codes plus extra structural requirements.
Making sure that container houses are explicitly permitted is the first step, after which one can consider if there are restrictions on how a container house may look, e.g., whether its height, its setbacks, or its foundation type are subject to limitations. Hiring a structural engineer is a must in many places from a safety perspective, especially when cut-outs are made, stacking is done, or foundations are laid. Besides that, the laws may be different from one state or one region to another: a coastal or a seismic area is likely to have stricter structural and wind-load requirements, whereas some rural areas may be more relaxed, but they still require permits and inspections. Wherever possible, associate your container home designs with pre-existing ones like modular dwelling, accessory dwelling unit, or relocatable building in order to get smoother approvals.
Policy Differences by State: For example, in the United States, Texas and Florida are considered to be more “container-friendly” states. On the other hand, California has much tougher requirements in terms of seismic and energy-efficiency. That’s why it is a good practice to always check with the local authorities before starting construction.
To know about Container Office, click here → Creative Container Office for Flexible Workspaces.
Step 2: Choose the Right Container
One of the most crucial initial choices when building a shipping container house is selecting the appropriate container.
New (one‑trip) vs used:
- New/one-trip containers naturally are pricier; however, they are typically in pristine condition with hardly any rust and only a few surface defects.
- On the other hand, buying used containers can save you money, though you will be tasked with a thorough inspection to check for any damage to the structure as well as signs of contamination.
Typically, a 40-ft high-cube container is ideal for most homes as the additional height allows for easier interior framing, insulation, and ducting, and it doesn’t feel so cramped. When purchasing shipping container units, check:
Rust: Concentrate on corner posts, roof edges, and floor joints since surface rust can be treated; however, deep pitting is a matter of concern.
Damages: Identify any twisted frames, crushed corners, or dents that could weaken the structure.
Contamination: If the container has a history of chemicals or an unknown cargo, it is highly unsafe to use. Check markings and ask the shipping container supplier for certificates and history.
Step 3: Prepare Your Land
Once you figure out the location and the type of house you want to build, you will have to prepare the site. This consists of removing vegetation, old buildings, and rubbish, as well as levelling the ground behind the house for proper drainage. Besides, figure out the way for delivery vehicles and cranes so that they can easily place the containers. Then make rough utility connections: water, power, and if needed, gas and sewer or septic.
Even if you want to have off-grid systems later, it is wise to have service access systems. One thing to remember: do not set the container piece directly on the ground. Soil contact traps moisture, causes rusting of the lower rails, and also makes levelling difficult. Therefore, plan a foundation that lifts the steel, and air and water are able to move underneath.
Step 4: Build the Foundation
Long-term performance and structural stability depend on a strong foundation.
Typical types of foundations include:
- Slab Foundation: A poured concrete slab that is supported with steel rebar is perfect for locations that are stable, well-drained, and for multi-container homes that are larger.
- Pier Foundation: Concrete piers or pads that support the corners (and sometimes the midpoints) of the house. Plus, they improve the ventilation under the container and provide easier access to service.
- Crawl Space: A perimeter stem wall or block foundation with a crawl space is very
Recommendations by Different Terrain:
- Flat Stable Soil: Either slab or piers will work; if you want a more solid feeling and better thermal mass, go for a slab.
- Sloped Land: Piers or crawl space foundations are a good way to adapt to grade changes without too much excavation.
- Wet or Flood-Prone Areas: Using piers to elevate the container or having a raised crawl space is a good way to keep the container above water levels during floods; check with your local floodplain regulations.
Step 5: Deliver and Place the Container
Schedule delivery once the foundation is completed. Usually, containers are carried on flatbed trucks, and then a crane or a heavy forklift is used to lift and place them. Make sure there is clear access, including adequate vertical space for crane booms and overhead cables.
After placing the container on the foundation, test for level and alignment, and then fasten it. Popular methods include welding the containers’ corner castings or base rails to steel plates that are permanently embedded or with bolts through the specially designed brackets. Correct anchoring of the container prevents displacement due to wind, seismic activities, or minor soil shifting and is particularly vital when you are stacking containers or making large openings between them.
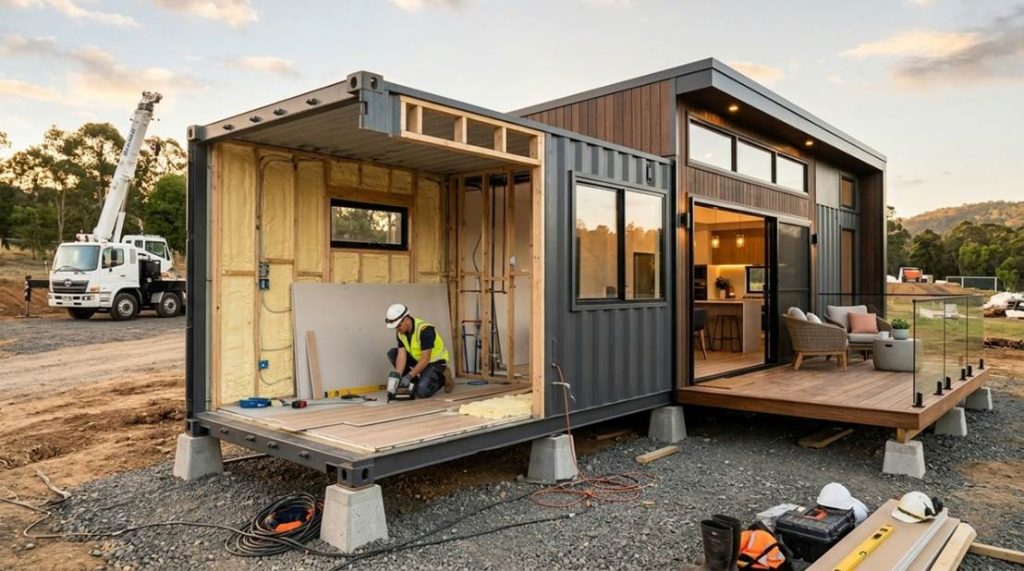
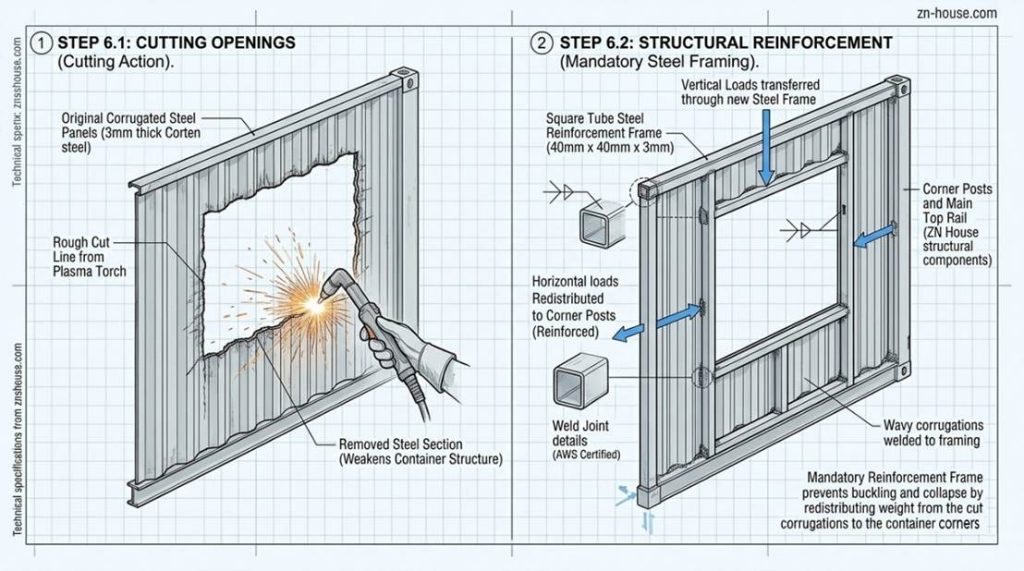
Step 6: Cut Openings & Reinforce Structure
In order to convert a steel box into a lived-in house, one of the things that you will need to do is to make cuts for doors, windows, and, if there are containers next to each other and you want to create flow between them, then interior connections as well. From the standpoint of risk, this is probably the riskiest step in the process of building a shipping container house if you start this without getting engineering help.
Every incision on the container means that you take out part of the container’s corrugated wall. However, the corrugated wall helps a lot in making the container a strong and sturdy shelter. So, if you make large enough openings, especially on the walls that carry the load or on containers that are stacked, then you have to reinforce them with steel frames, headers, and posts to be able to transfer the loads around the opening. If you use the wrong tools, cut too much, or don’t do reinforcement, then it can cause the deformation of the container, welding cracks, and in some cases, even structural failures can occur.
Wherever you cut:
- Design structural frameworks (box frames) for large openings.
- Prepare cut edges by grinding and treating them to avoid rust.
- Make sure that loads from stacking and the roof are transferred through corner posts or additional steel, but not through unsupported walls.
Step 7: Install Doors, Windows & Framing
Opening doors and windows properly is very important when sealing a home from the elements. After marking the openings in your structural sheathing and installing a waterproof membrane over the entire exterior surface of the house, mount the exterior doors using a combination of mechanical fasteners and liquid-applied flashing to create a weatherproof seal around their perimeter.
Choose high-quality, energy-efficient windows with features that include multiple panes, low emissivity (low-e) coatings on the glass surfaces, and vinyl or wood frames with fiberglass or foam inserts. These help in maintaining the interior temperature and providing comfort throughout the year.
- Wood framing is widely known and loved by the majority of DIY-builders for its ease of handling and the fact that it supports the use of regular insulation products!
- Light-gauge steel framing boasts straightness and dimensional stability, and it is a natural fit for steel structures, whereas exposing the workers to the need for specialized tools and fasteners.
Whatever your decision is, design framing so that it creates as few thermal bridges as possible. A thermal bridge is created when a heat-conducting material (e.g., steel) forms a link between the interior and exterior surfaces, enabling heat to flow around the insulation layer. Hence, to limit thermal bridging:
- Do not let steel elements run uninterrupted from the inside to the outside of the building without thermal breaks. Wherever feasible, apply uninterrupted layers of insulation.
- Be very meticulous in the detailing around the door and window frames, roof connections, and floor interfaces.
Step 8: Plumbing & Electrical Setup
Once the framing has been completed, it is time to start installing plumbing and electrical systems. By properly planning these steps, you can avoid redoing work and ensure your container house is safe and up to code. Plumbing layout consists of cold and hot water supply lines, drain and vent lines, and additional features like rainwater harvesting or greywater reuse if you are going partially off-grid. Electrical planning includes circuits, panels, outlets, lights, and any special equipment like HVAC, EV chargers, or induction cooktops.
Since any failure in these systems might result in damage or safety hazards, it would be best to hire licensed professionals to do the installation, even if you are doing some simple tasks yourself. Moreover, professionals are aware of local code requirements such as GFCI outlets near sinks, smoke and CO detectors, and fire-stopping or conduit rules. Sometimes the best solution is a combination of professional rough-in and DIY finishing.
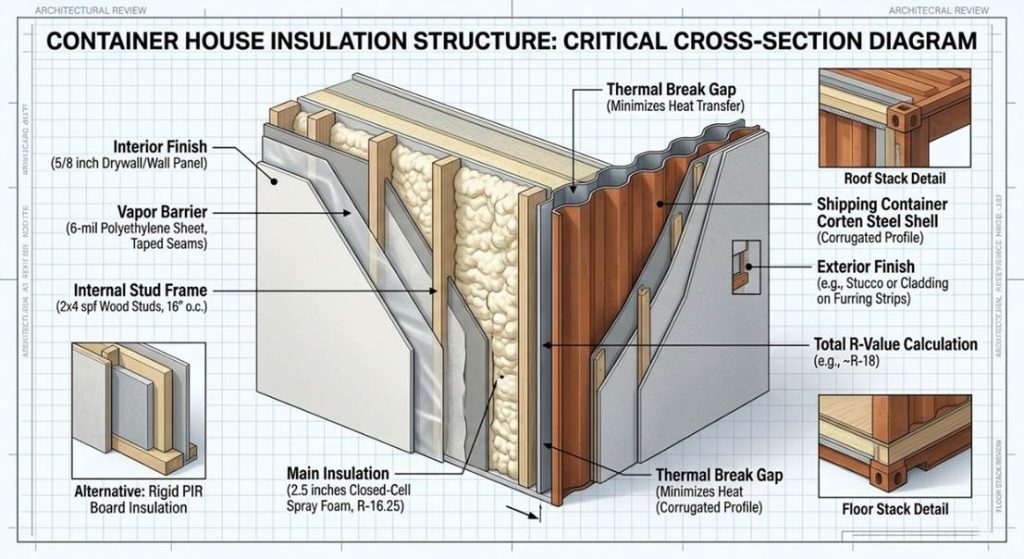
Step 9: Insulation & Climate Control (Core Step)
Metal boxes can be extremely cold and hot because metal conducts heat quickly. A metal container home, for example, can be really hot in summers and freezing cold in winters, if there is no appropriate container insulation.
Spray foam (especially closed-cell) is usually the favorite choice for container homes, given that it sticks directly to the steel, seals the tiniest openings, and supplies very high insulation value (R-value) per inch. At the same time, it improves air sealing and serves as a vapor retarder. Other options include rockwool, PIR boards, or polystyrene, which need to be integrated into a comprehensive wall system.
Key Goals:
- Thermal Protection: Support interior temperature levels that people find comfortable in hot as well as cold weather situations.
- Moisture Control: Stop the formation of condensation and rust on the steel shell.
- Air-sealing: Minimize the passage of cold air and the subsequent loss of energy.
Step 10: Interior & Exterior Finishing
You can complete the exterior and interior once the structure, services, and insulation are in place. Interior finishing consists of:
- Flooring: Vinyl, laminate, engineered wood, polished concrete, or tile, depending on budget and style.
- Wall surfaces: Drywall, plywood, OSB, or decorative panels; paint colours can make compact spaces feel larger and brighter.
- Ceilings: Smooth or panelled finishes, with recessed lights or surface fixtures.
Exterior cladding options can include simply leaving the corrugated steel of the shipping container exposed (after suitable anti-corrosion and painting treatment) or fixing on siding such as wood, fibre cement, metal panels, or composite material. On the other hand, balconies, terraces, garden structures, and outdoor staircases not only provide additional area for outdoor living but also enhance the perception of the home’s size.
Common Mistakes to Avoid (High‑Click Module)
Ignoring Regulations: Building without following zoning and permit regulations may result in fines, eviction, or trouble selling the property down the road.
Neglecting Insulation: Extreme temperatures, condensation, and high energy costs are caused by inadequate or badly designed insulation in container homes.
Unauthorized Structural Modifications: Large openings that are cut without engineering and reinforcement run the risk of sagging, twisting, or long-term structural damage.
Overlooking Shipping Costs: Late in the project, your budget may blow up if you don’t account for transportation, access, and crane time.
Inadequate Rust Prevention: The container shell’s lifespan is shortened by failing to clean, treat, and paint steel surfaces, particularly the underside and cut edges.
DIY or Hire Professionals?
You can save a lot of money and have the liberty of making all the decisions if you choose to build the house by yourself. However, a container house is a considerable amount of work, along with installing structural steel, meeting building codes, and working with other trades, etc. Lots of newbies who participate don’t quite understand how long and hard it can be, especially regarding structural work, utilities, and building inspections.
Conversely, deciding to hire the experts – architects, engineers, and specialized container builders – will no doubt make the cost go up but additionally, it will bring a substantial improvement in safety aspects, quality of construction, and likelihood of getting the necessary permits. A feasible strategy that might work for many homeowners is the mixed approach: engage the professionals for aspects such as design, structural changes, foundation, and installing utilities at the rough-in stage while you take care of easy tasks like interior painting, flooring, and simple carpentry. This is how you would be able to control the budget, quality, and time effectively.
How Long Does It Take to Build?
Here is a very simple estimate of the timeframe: DIYers, who want to build a container house by themselves, without hiring a professional, usually think that “how to build a shipping container house?” means a working period from container delivery to house move-in of about 2-6 months, provided work is constant and there are no major interruptions. However, becoming a master, fixing mistakes, or waiting for inspections can make the time closer to the longer end of that period.
In contrast, professional construction, especially the ones based on preassembled container modules, can normally be finished in around 1-3 months after the permits and design are finalized. Factors affecting the schedule are permit processing times, site conditions, weather availability of cranes and trades, and the complexity of the design (single container vs multi-container, off-grid systems, advanced finishes, etc.).
Final Thoughts
One thing that a shipping container house has really going for it is how well a nice balance of flexibility, control, and customization its design can offer. For this reason, many first-time builders and small developers find it a very attractive proposition. By making a modular steel shell, you can create a step-by-step project, change the interior design after you have moved in, and even alter the general appearance by adding features that are typical of modern designs. If you take a look at the steel container house versus a conventional one, the former can easily become the talk of the town thanks to its modern elements and the quite compact nature of the overall form. However, the safety issue is still very much present. Contact a structural engineer to know whether your containers will be modified or cut, or stacked. In fact, doing due diligence and checking the structural integrity of your containers is a major step toward your ensuring your safety.
Besides, don’t just depend on a simple Google search; look into all the documentation and approvals needed to construct container homes in your region. Contacting local officials is the most reliable method to getting a clear and precise understanding of the matter. After you have the container and the required permits, you can move on to designing the coziest room plan for your family. Meanwhile, you may decide on the insulation degree that will make you comfortable both in winter and in summer. Later, take a solitary walk and mark those spots where you can do the work yourself and the rest where you will need to pay for professional help. At this point, it is very important to be realistic and acknowledge your advantages and limitations. With these simple steps, it is really possible to build a very attractive and comfortable container house.
Since errors in plumbing and electrical work can lead to dangerous situations as well as costly damages, you should consider having these systems designed and installed by trained experts. If you are looking for a team that knows containers inside and out, ZN House can assist by providing engineered plans, integrated plumbing and electrical designs, and ready-to-assemble solutions that make on-site installation easier. Get in touch with ZN House to go over your plans and ensure that the utilities of your container home are secure, up to code, and prepared for the future.
Similar Posts
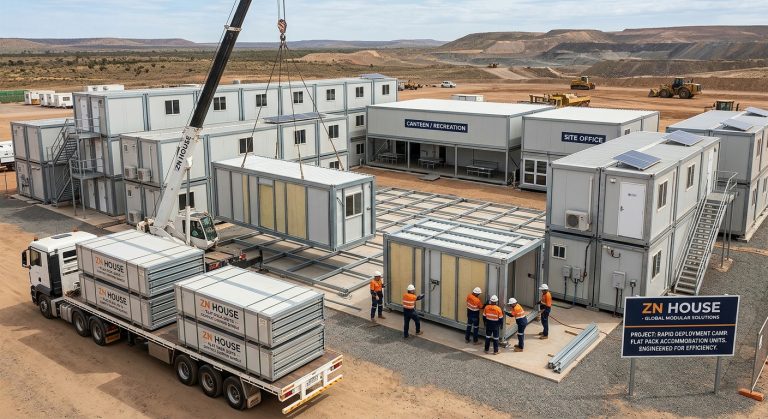
Flat Pack Accommodation Units – Modular Living Solutions for Every Project
The demand for rapid, high-quality, and scalable housing options is increasing day by day. Flat pack…

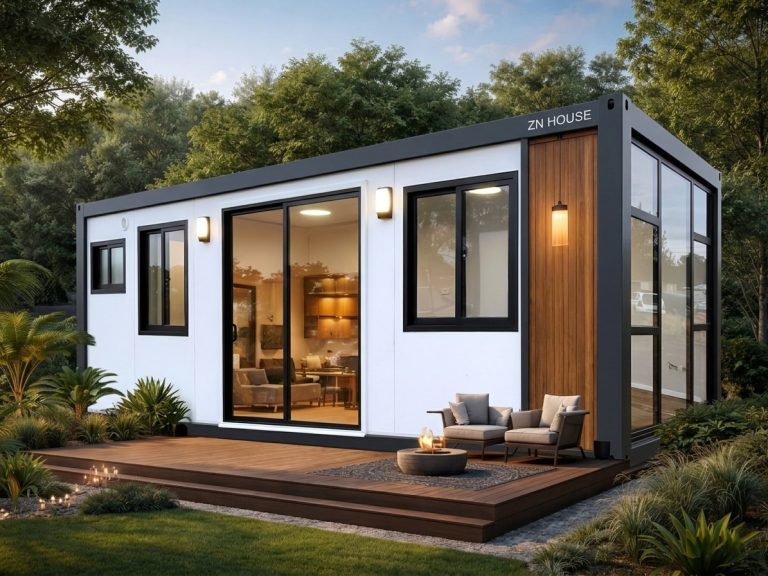
Discover the Innovation of Shipping Container Homes
Transform your living experience with our innovative Shipping Container House solutions. Designed for versatility, efficiency, and affordability, our…
How to Insulate a Container House: Complete Guide (2026)
The architectural trend of container houses has turned into an international movement that promotes the idea…

Foldable container house expandable living spaces
Foldable container house expandable living spaces have emerged as a game-changer in adaptive housing, solving niche…
Classroom Container Prices: How to Future-Proof Your Investment
What Are Classroom Containers? When schools face space crunches or tight budgets, many educators are discovering…
Collapsible Container Homes Durability
In the evolving world of innovative housing solutions, folding container house for sale, folding container house,…


